Are you fed up with the slowdown of your Windows 10 over the time? Well, it happens. However, there are many reasons why your PC may be working slowly.
Just like there are reasons for lagging, there are many ways to fix our slow Windows 10. We have summarized the 18 best tips to Speed up your Windows 10 laptop or desktop.
1. Switch-off and restart your PC
This is the first step to speed up your Windows 10. It is effortless, as you can do it just with a single click. Restarting your PC helps to clean your PC’s memory and obstruct or force stop all the unwanted processes that are running in the background. These processes running in the background eat much of the memory and slow down the computer.
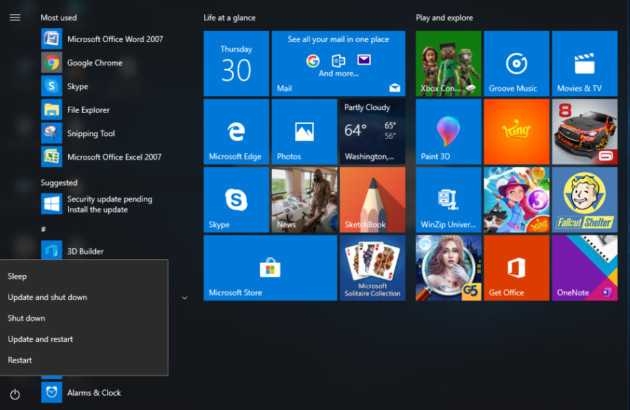
Restarting the computer ensures that these unwanted processes are killed, and it, in turn, frees the absorbed space on the RAM. Once your computer restarts, you may launch the application you want.
2. Keep Your Computer Up To Date by Downloading and Installing the Latest Updates
Keeping Windows up to date not only helps you get rid of bugs but also maintains the speed of your computer. While updating, the computer downloads the latest drivers and files, which results in the smooth and fast operation of Windows 10. The following are the simple steps to update Windows.
- Check Windows update by going to “start” and “settings” then “Update & Security.”
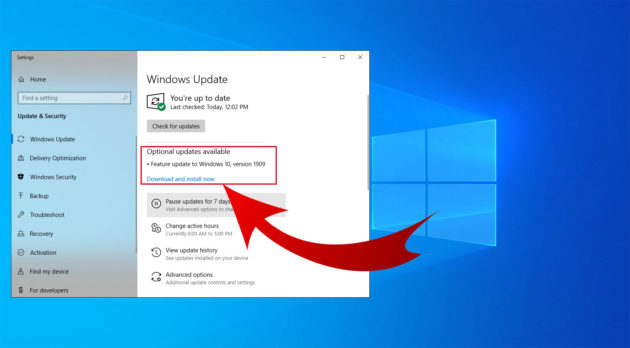
- Choose the updates; click on “Install.” Once updates are installed, restart your computer. You will see that the speed has improved substantially.
3. Change the Power option to “High Power” mode
In most of the cases, the computer is adjusted at “Balanced” mode or “Power Saving” mode. Though it saves on power, the speed of the computer decreases substantially. Changing the mode to “High-Performance” will consume a bit of energy, but it will boost the speed of Windows 10. Following are the steps to follow for enabling High-Speed mode:
- Search for “power & sleep” by launching the Windows key. The new window will show “Power & sleep settings,” click on it.
- On the right side of your screen, you will find “Additional power settings.” Click on it.
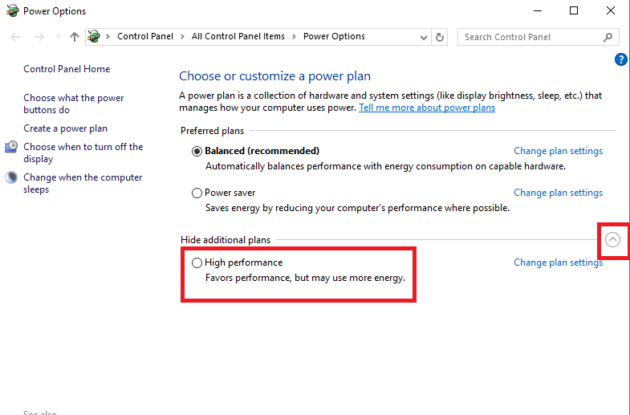
- Click on the ^ to expand options. Select the “High-performance” option.
4. Startup Programs must be Disabled
If too many programs are running in the background, your PC will definitely slow down as most of the RAM remains consumed. This will increase the booting time of your computer too. You can speed up your Windows 10 by disabling the programs, which you seldom use or are unwanted.
Note: To disable does not mean disabling of essential programs. Never disable “Microsoft Programs” and antivirus software, if any, as these are vital for the safety and security setup of your computer.
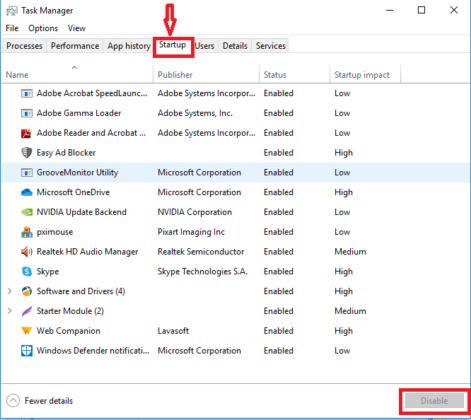
- Launch “Task Manager” by right-clicking anywhere on the taskbar.
- Click on “Startup”
- From the list that appears, select all those programs you use rarely. Then click on the “Disable” tab. It will remove the selected programs from the startup.
5. Disable “Windows tips and tricks” option
Windows keep track of whatever activities you perform on it. Accordingly, it offers tricks and tips about activities you might want to perform using the OS. However, these tips and tricks are neither practical nor useful most of the time. I personally hate to be under my computer’s virtual surveillance whenever I am using it.
To keep things rather private, you need to opt-out of getting these unnecessary notifications of tips and tricks. This will also improve the speed of your Windows 10 to a great extent. Do the following:
- Tap the Start button and go to “Settings” and then go to system> Notifications & actions.
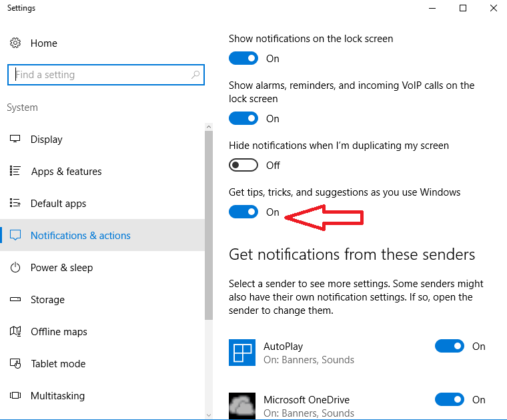
- Scrolling down will take you to “Notifications.” Uncheck “Get tips, tricks, and suggestions as you use Windows.” That’s it. You will no longer be notified with unnecessary prompts.
6. Use ReadyBoost
ReadyBoost, as the name itself says boosts the speed of your Windows 10 PC. It allows you to utilize the space available on the removable disc without opening your PC or adding additional RAM. All you need is a USB flash drive having 500MB of free space with a suitable data transfer speed. Steps to follow for enabling ReadyBoost:
- Launch File Explorer
- Tap “This PC” on the left side of your screen
- Go to “Devices and drives” and right-click on USB flash drive
- Click on “Properties”
- Tap on “ReadyBoost
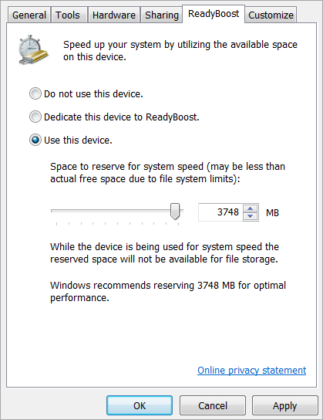
- Click on “Dedicate this device to ReadyBoost”
- Then click “OK” and “Apply”
Note: Enabling ReadyBoost won’t benefit those who are using an SSD.
7. Clean the Disks by Running Disk Cleanup
Cleaning up of disks is very unlike defragmentation. Defragmentation is known to rearrange the files according to the priority of the user, whereas Disc cleanup removes the files that are unnecessary, thereby creating more space on the disc.
- Go to “This PC” and right-click anywhere. Go to “Properties”
- Tap on “Disk Cleanup” below the “General” option. This will make the utility to scan your drive and also calculate the total used and free space.
- Once the scanning is complete, tap on the “Clean up system files.” This will start scanning your disk yet again.
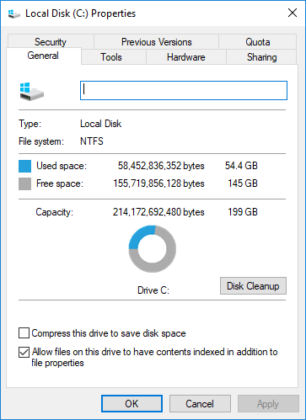
When the 2nd scanning process is done, click “OK.” A notification prompting, “Are you sure you want to permanently delete these files?” will show up on the screen. Tap on “Delete Files.” It will delete only those files that are unnecessary.
8. Disable system visual effects
Windows 10 incorporates a number of visual effects, most of which are enabled by default. These visual effects undoubtedly improve the user experience while watching animations and other sophisticated visuals, however, they make the system very slow.
If you really want to speed up Windows 10 on your PC, you need to disable these visual effects. Here is how you can do that.
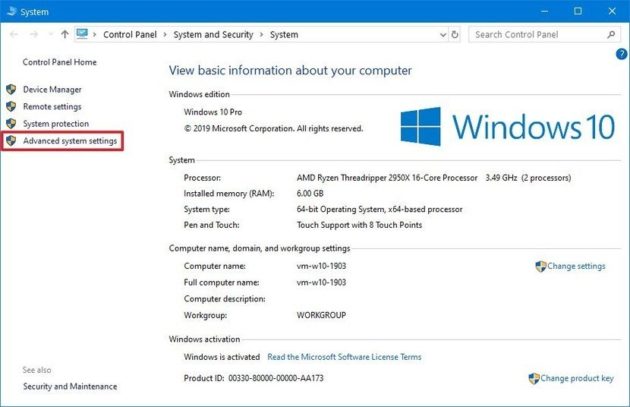
- Open Settings > System > About
- In “Related settings” tab, select “System info” on the right side of your screen
- Now on the left side, click “Advanced system settings.”
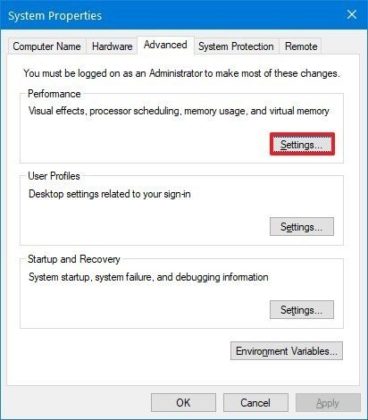
- Tap on the “Advanced” tab.
- Now in the “Performance” tab, tap “Settings.”
- Now click the “Visual Effects” tab
- Click on “Adjust for best performance.” This will disable all visual effects and animations.
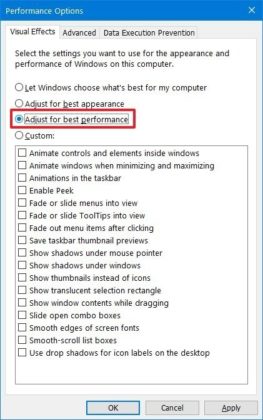
Note: Disabling visual effects may bring unwanted changes in the font too. To keep the fonts good looking and readable, you need to go to the “Custom” option and uncheck all the settings except “Smooth edges of screen fonts” checked. And then click on “Apply” and “OK.”
Performing the above will surely improve the speed of your computer by a right margin.
9. Defragmenting Disk for Optimization
There is a built-in utility in Windows 10 known as Disk Fragmentation. This feature enables you to rearrange the files according to your priority on the disk to avoid the continued occupation of space. This, in turn, improvises the speed of Windows 10 on your PC. Follow these steps to perform Disk Fragmentation:
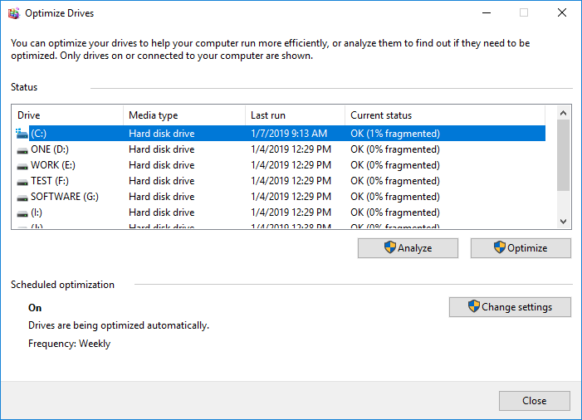
- Launch “Windows.” Search for defragmenting, tap on “Defragment and Optimize Drives.”
- Select your “C drive” and then click on “Optimize.”
10. Erase all Temporary Files
Temp files are those files that are useful only temporarily. Therefore, there is no reason to hold them on, on your computer, as they kill disk space unnecessarily.
If you are doubting whether deleting these files will increase the speed of your PC, the answer is a big yes. Most of the users have experienced significant changes in the speed of Windows 10 after removing these “Temp Files.” Steps to remove “Temp Files”:
- Tap on the “Windows” Key and write, “run.” Now click on “Run.”
- Input %temp%and then tap “OK.” This will open Windows Temp folder
- Select all the files you find in the folder and tap “delete.”
- Get back to rerun box, type temp, click “OK”
- Once you are prompted with a notification saying, “You don’t currently have permission to access this folder”, all you need to do is to click on “Continue” and then proceed to delete all files.
- Open Run box once again and type “prefetch” and then “Continue.” Whatever files you find there in the folder there, delete them all.
11. Try Disabling “OneDrive sync” option
OneDrive is an inbuilt utility of Windows 10, which enables you to sync or store your files to the cloud. You will have access to those files later whenever you want by logging into your OneDrive account. Undoubtedly, it is one of the best features of Windows.
But the fact that automatic synchronizing is enabled all the time, it kills disk space and slows down the computer. If you find any of the files very important, you may upload it to the cloud manually whenever you want, automatic synchronizing is not needed at all.
- Move the cursor on to “OneDrive” and right click on it. Then go to “Settings” then to “Account”.
- From there choose the “Unlink this PC” option and then “Unlink account”
12. Disabling Transparency
Check whether the “Transparency Effect” on your PC has been enabled by default. If it is, your computer will be a bit slow. Disabling it will save a lot of memory and consumption of resources leading to speeding up your PC.
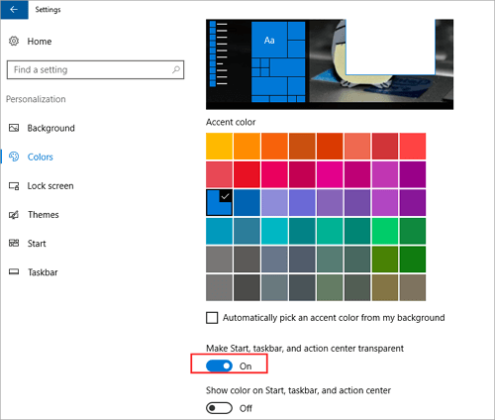
From control panel click on “Personalization”, then go to “Colors”, put off the “Make Start, taskbar, and action center transparent” option.
13. Disabling or Turning off the “Search Indexing”
Again, it is one vital feature of Windows 10. Its function is to create an index of all files on your PC. However, doing that it occupies a lot of space leading to a slow down of your computer.
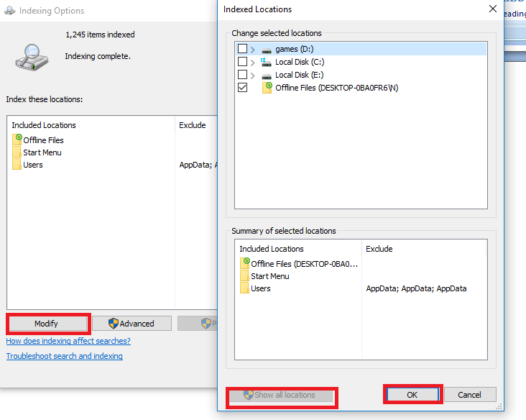
The best thing is you can disable the function at your will and in turn, you will see that your computer’s speed has increased. Here is what you need to do to disable search indexing:
- Open search box and type “Indexing Options” there. Select “Modify”
- Then tap on “Show all locations”, then “Clear all the selected locations”
- Finally, tap “OK” button
14. Migrate your Operating System to SSD/HDD
In case not much of space is left in your PC and it is becoming hard for you to create a partition, the best thing you can do is to migrate your Windows 10 OS to an SSD that performs better or to a Hard Disk which is large enough to accommodate it.
This can be done using EaseUS Partition Master. Following are the step you need to perform:
Note: This migration process will result in the deletion of all present partitions including the data stored on the target disk. Don’t forget to take a back-up of all critical files if any, you have saved there.
- Launch EaseUS Partition Master and tap on “Migrate OS” as shown below:
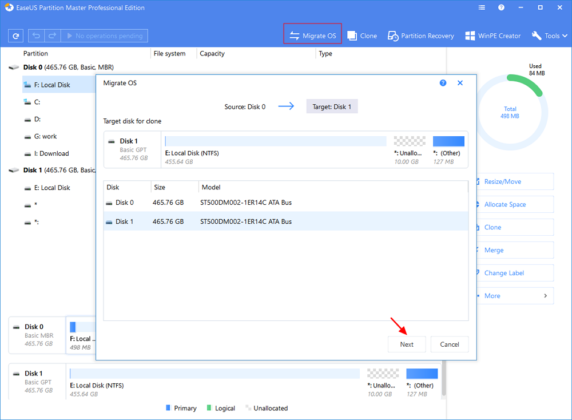
- Now, choose HDD/SSD as your destination disk. Then click on “Next”
- Tap on the “Migrate” button to proceed as shown in the image below
Don’t forget to see the preview layout of your target disk. Alternatively, you may customize the design of your target disk as you won’t do it by clicking the disk layout options too. Lastly, clicking on the “Proceed” button will initiate the migration of your Operating System to a new selected disk.
15. Check and remove Viruses and Malware
If a virus, malware, or malicious software has infected your computer, it will definitely slow down your Windows 10. You can track and remove them by installing any of the antivirus software available in the market or you may buy them online too.
Windows 10 has an in-built feature known as Windows Security, which you can use to scan all those malicious things and viruses and fix them. Once these unwanted things are tracked and kicked off your system, surely the speed of your system will be optimized to the next level.
16. Add More Juice to Your RAM
This is one of the easiest and effective ways to improve the much-wanted speed of Windows 10 is by adding more RAM to it. Typically, for Windows 10 to operate smoothly, the minimum requirement is 4GB RAM.
You may check the details of the RAM installed in your system by accessing the system information. RAM chips are available in various configurations. Make a thorough research on which one will be compatible with your system before getting one.
If the RAM is less, very obviously it will not be able to withstand the support needed to all the apps and will result in a slowdown of your PC. If you are experiencing the same, inserting a new and large capacity RAM will definitely boost the performance.
17. Manipulate Registry
All of the settings that are required by Windows 10 OS are held by Windows Registry. It ensures the proper functioning of the applications. Hence, it is possible for you to tweak or manipulate the system according to your wish.
You may have experienced a number of times that it takes a few seconds for a folder to open after double-clicking on it. The response time of the mouse is very critical. If it is increased marginally, it, in turn, reduces the pop-up time and the descriptions are shown much faster.
Note: Windows Registry is a host to a number of vital things of your PC. Please make sure before making any changes as the changes made by you may impact Windows 10 adversely.
- Launch “Run box” then go to “Regedit”
- In the Control Panel hit HKEY_CURRENT_USER then double click “Mouse folder”
- Click twice on “MouseHoverTime”. Enter the new value to “10”
- Open “Desktop Folder” by double-clicking on it and then “MenuShowDelay”. Enter new value “10”
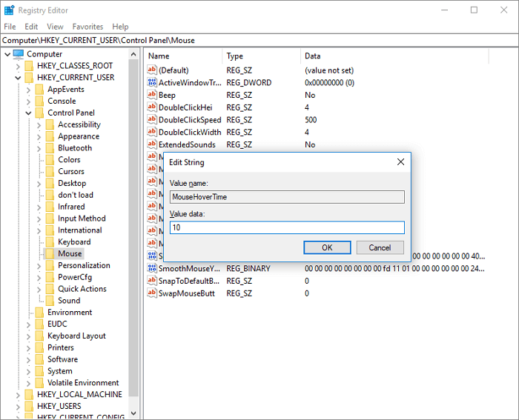
After the above, switch off your PC for a while and power on after a few minutes. Above is one of the easiest and safest methods. There are many other ways too. whichever approach you adopt, please be careful that the changes made do not harm your system in any way.
18. Make it a habit to run “System Security Maintenance”
There are a number of inbuilt utilities in Windows 10 that may need a regular check-up for malware, defragmentation, checking for updates, etc.
By default these are done by your computer automatically are the default settings support it that way. However, you can change the settings and perform system security maintenance manually. This way, you will save a lot of space on your computer and it will help in improvising the speed of Windows 10 on your PC.
You may change the settings by following these simple steps:
- In the Control Panel menu, go to “Security and Maintenance” under “System and Security”
- Click the “^” button and it will expand the maintenance options
- Click on “Start Maintenance”
The methods incorporated in this article are tried and tested. However, you are advised to take a proper back of all your important files before performing any of these. Keep your computer manual handy in case you need it.
Contents of the Article
- 1. Switch-off and restart your PC
- 2. Keep Your Computer Up To Date by Downloading and Installing the Latest Updates
- 3. Change the Power option to “High Power” mode
- 4. Startup Programs must be Disabled
- 5. Disable “Windows tips and tricks” option
- 6. Use ReadyBoost
- 7. Clean the Disks by Running Disk Cleanup
- 8. Disable system visual effects
- 9. Defragmenting Disk for Optimization
- 10. Erase all Temporary Files
- 11. Try Disabling “OneDrive sync” option
- 12. Disabling Transparency
- 13. Disabling or Turning off the “Search Indexing”
- 14. Migrate your Operating System to SSD/HDD
- 15. Check and remove Viruses and Malware
- 16. Add More Juice to Your RAM
- 17. Manipulate Registry
- 18. Make it a habit to run “System Security Maintenance”
